
Setting Up A Free Blog
Dec 31, 2014 · 12 minute read · Commentsblog
How to set up a free blog using Octopress 3, GitHub Pages, git and a few other free tools.
Results This Tutorial
- A basic blog setup:
- Post first blog entry.
- Themes, layout and prettiness comes later.
- Close to free as possible:
- Free as in beer (almost no money).
- Free as in speech (open source).
- Control using command line tools:
- Change Management using git.
- Blog and web pages are served as static html.
- Preview and author locally using text files.
- Publishing is a simple shell command.
Tools Required
This tutorial assumes usage and familiarity with the following tools:
- bash - Unix shell command line terminal:
- Text editor - needed to configure and write blogs:
- git - for source code control.
- There are alternatives like Mercurial or Subversion, but Git makes the most sense here.
- GitHub - providies hosting of the web page and git repository.
- There are alternatives like BitBucket, Gitorious, Heroku, etc.
New Tools Used
Jekyll and Octopress 3
This tutorial uses git and GitHub for source code control, and if you check out GitHub Pages you’ll see that they “support Jekyll, a simple, blog-aware static site generator.” (from Using Jekyll with Pages).
Jekyll allows you write your blog and website in Markdown in text files. With a simple build command Jekyll converts these into static html pages.
There are other alternatives such as Hyde or WordPress, use google if you want to find out more.
Since this tutorial is using git to store the blog and website, it leads to a simple work flow for creating a blog post:
- Create a new post text file.
- Write Markdown in that text file with our editor.
- Preview the resulting site locally using Jekyll.
- Add and commit this file locally using git.
- Publish the web site by pushing to GitHub.
- GitHub will then automatically regenerate the website using Jekyll on it’s servers.
Jekyll itself is written in Ruby and is a fairly complex and low level framework. To make life simple this tutorial will use Octopress 3 on top of Jekyll.
From Octopress home page:
Octopress is a framework designed by Brandon Mathis for Jekyll, the blog aware static site generator powering Github Pages. To start blogging with Jekyll, you have to write your own HTML templates, CSS, Javascripts and set up your configuration. But with Octopress All of that is already taken care of.
NOTE: As of December 2014, Octopress is at version 2, and version 3 is being actively developed and documented as a release candidate. Hopefully by the time you’re reading this it will have been released, well tested and documented.
Markdown
Markdown is a simple plain text based formatting language which is typically converted into HTML to render on a web page.
By default Jekyll and Octopress 3 use Markdown text files to represent blog posts. Also GitHub uses Markdown for it’s wiki, and README files, so knowing this will be useful.
Alternatives to Markdown such as Kramdown, Textile and others exist and might be supported by Jekyll and Octopress 3.
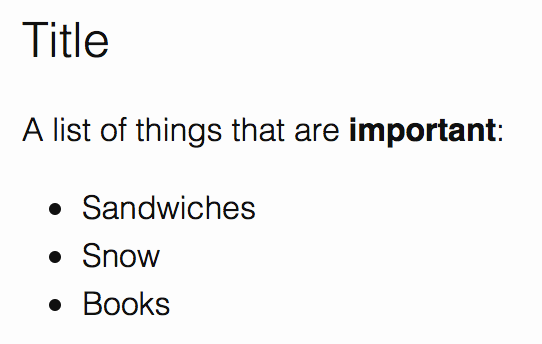
For example the following is Markdown text:
Title
=====

A list of things that are **important**:

* Sandwiches
* Snow
* Books
In a browser, using the default Octopress 3 theme, this would look like:
The equivalent generated HTML would be:
<h1 id="title">Title</h1>

<p>A list of things that are <strong>important</strong>:</p>

<ul>
  <li>Sandwiches</li>
  <li>Snow</li>
  <li>Books</li>
</ul>
The general idea is that Markdown is easier to read and write, but you can include HTML if you need more control or something specific that Markdown does not provide.
Ruby
You may or may not be familiar with Ruby. For this tutorial you’ll only need to ensure it’s installed and install Ruby Gems which is pretty easy.
Generally it’s worth learning Ruby so you can go deeper into Jekyll, Octopress 3 and many other useful tools and applications.
YAML
YAML is a data serialization standard. Jekyll and Octopress 3 use this in some configuration files. It’s also used by many other tools and applications, so it’s worth learning too.
Tutorial
Check Ruby Is Installed
Typically Ruby is installed on most Unix-like operating systems. As mentioned earlier, this tutorial uses Mac OS X Yosemite 10.10, but you’ll likely have something different.
Let’s see if Ruby is installed already:
$ type -p ruby
/usr/bin/ruby
$ ruby -v
ruby 2.0.0p481 (2014-05-08 revision 45883) [universal.x86_64-darwin14]
If you have Ruby version 2.0.0 or later you’re probably good to go.
As shown above, on Mac OS X the default version of Ruby is
/usr/bin/ruby. This is the system version and installing Ruby gems
will require you to be super-user or use sudo, which is not
advisable.
The best solution is to install a local up-to-date version of Ruby, one good way to do this on Mac OS X is to use Homebrew package manager.
By default Mac OS X does not have Homebrew, so you may need to install it. See the Homebrew Install page, which on Dec 2014 says:
$ ruby -e "$(curl -fsSL https://raw.githubusercontent.com/Homebrew/install/master/install)"
If you already have Homebrew, you probably know the drill to install ruby:
$ brew update
$ brew install ruby
...
$ ruby -v
ruby 2.2.0p0 (2014-12-25 revision 49005) [x86_64-darwin14]
Other operating systems will have different ways to install ruby. However once that is done, installing Ruby Gems is usually the same across all platforms.
Install Jekyll and Octopress 3
Next install Jekyll and Octopress 3:
$ gem install octopress --pre
Fetching: fast-stemmer-1.0.2.gem (100%)
Building native extensions.  This could take a while...
# lots of similar output for about a minute ...
$ type octopress
octopress is /usr/local/bin/octopress
So far so easy. Installing Octopress 3 automatically installs Jekyll as a dependency. See Octopress 3 for more details.
NOTE: The --pre option is required until Octopress 3 is officially released.
Create Blog Locally
Now you can create the bare bones Octopress and Jekyll directory, which contains the most basic website and a single example blog post.
For personal GitHub Pages the repository on GitHub has to be called
NAME.github.io, where NAME is your account name, so for consistency we
keep the directory and repository name the same. See
GitHub Pages Help
for more help.
NOTE: Replace NAME with your GitHub account name.
$ octopress new NAME.github.io
New jekyll site installed in /Users/NAME/Projects/NAME.github.io.
Octopress scaffold added to /Users/NAME/Projects/NAME.github.io.
Preview Blog Locally
The previous step created enough data that Jekyll can build and view the equivalent static HTML site.
The command jekyll serve will:
- Build the HTML site.
- Start a simple local web server
- Allow you to locally preview your site in your browser.
- Rebuild the site if any files are modified, so you can watch changes.
$ jekyll serve &
[X] NNNN
Configuration file: /.../NAME.github.io/_config.yml
            Source: /.../NAME.github.io
       Destination: /.../NAME.github.io/_site
      Generating...
                    done.
 Auto-regeneration: enabled for '/.../NAME.github.io'
Configuration file: /.../NAME.github.io/_config.yml
    Server address: http://127.0.0.1:4000/
  Server running... press ctrl-c to stop.
As the command output shows we can open the local web page. Neat trick
is that on Mac OS X the command open will do this for us:
$ open http://127.0.0.1:4000/
Initialise and Commit To Git Locally
NOTE: Replace NAME with your GitHub account name.
$ cd NAME.github.io
$ git init
Initialized empty Git repository in /.../NAME.github.io/.git/
$ git branch -m source
$ git add .
$ git commit -m 'Initial commit.'
[master (root-commit) b6f0c3c] Initial commit.
 19 files changed, 820 insertions(+)
 create mode 100644 .gitignore
 # lots of files ...
Notice that the source to the blog should not be the master branch,
the example above renames the initial branch to source.
With Octopress 3 as of Dec 2014, the best way to publish to
GitHub Pages will be to locally generate the site HTML and push that
to the master branch on GitHub. Fortunately as we’ll see octopress deploy to do this.
Therefore locally and on GitHub we’ll have two (or more branches):
- source - The Octopress 3 and Jekyll source files that you edit.
- master - The generated HTML site pushed to GitHub which is your published blog.
Perhaps in the future GitHub will support Octopress 3 and you will be able to just push source, but as it currently stands the GitHub version of Jekyll has trouble with plugins (and also you’d probably have to keep in sync). This is a shame, and somewhat unexpected, but only makes our life a little harder.
Push Source To GitHub
First you’ll need create your GitHub Pages personal page repository on GitHub:
- Login and to https://github.com/new to create a repository.
- Make sure the “Repository name” is
NAME.github.io, whereNAMEis your “Owner” account name. - Make it public or private, but note that a private repository still produces a public web page.
- Don’t initialise with any files.
Once done you can push the local git repository source up to GitHub. Replace
NAME with your GitHub account name, and REMOTE with the name of
the remote used to push to. Good examples might be origin or
github. Also note that the remote URL assumes you’re using ssh
connections to GitHub.
$ git remote add REMOTE git@github.com:NAME/NAME.github.io.git
$ git push --set-upstream REMOTE source
Set Up Deployment Of Website To GitHub
So far you have only pushed the source branch containing the
Octopress 3 and Jekyll configuration and Markdown. GitHub
serves your blog from the master branch.
Fortunately Octopress 3 has the octopress deploy command which
automates the whole procedure.
Initialise Octopress 3 deployment using git, replacing
NAMEwith your account name:$ octopress deploy init git --url git@github.com:NAME/NAME.github.io.git ... Remember to add _deploy.yml to your .gitignore. ...Note that the command suggests you add the generated
_deploy.ymlto.gitignore. This is probably wise if you need to add passwords or other sensitive information.Edit
_deploy.ymlto check how Octopress 3 is configured deploy using Git.By default Octopress 3 uses the remote named
deployto push the website to, so lets set this up:$ git remote add deploy git@github.com:NAME/NAME.github.io.gitHaving the source and published websites as seperate remote names might be useful if one changes in the future.
Deploy the built website:
$ octopress deployFor the first deploy to GitHub, it will take up to 30 minutes to generate your website.
While you wait, you might want to:
- Bookmark
http://NAME.github.io/in your browser, which is where you personal page will reside. - Keep refreshing every 5 minutes or so, eventually you should see the same thing as your local preview.
- Read more about Markdown
- Read more about Octopress 3
- Read more about Jekyll
- Bookmark
In my experience any subsequent deployments of blogs markdown and web content (assets, html) after this cause the website to update very quickly (under a minute), but configuration changes to Jekyll and Octopress 3 seem to take up to half an hour.
Optional: Create a Custom Domain
You might be happy with hosting your blog at http://NAME.github.io/
but typically registering a new domain and setting up DNS redirection
is pretty cheap.
I personally use Namespro, since they’re reasonably priced (about $60 for two domains over two years), have all the features I wanted (domain name registration, DNS provider, WHOIS privacy) and local to me in Vancouver, Canada.
Steps:
- Find a decent registrar and DNS provider you like and get a custom domain name.
- Add a CNAME file to your blog’s repository and push to GitHub.
- Set up a CNAME record with your DNS provider.
See https://help.github.com/articles/adding-a-cname-file-to-your-repository/ for more details.
Personalize The Default Blog
Currently the default blog created by octopress new is generic and not personalized with your information. We should certainly fix this now everything seems to be working.
- Fix global configuration. Edit
_config.ymland change:- title - your website title
- email - your email
- description - short description (of you and/or your blog) included by default at the bottom of all pages and posts.
- url - your page URL (eg.
http://NAME.github.io/or your custom domain. - twitter_username - your twitter account name if you have one.
- github_username - your GitHub account name.
Add changes to the repository:
$ git add _config.ymlFix the “About” text. Edit
about.mdand put some some Markdown describing you and/or your blog.$ git add about.mdCurrently jekyll 2.5.3, changing configuration does not update site. Restart
jekyll serve, replacing%1with the correct job number reported byjobs:$ jobs [1]+ Running jekyll serve & $ kill %1 $ jekyll serve &Remove the example post:
$ git rm _posts/*Make sure it looks good on the local preview.
Push source changes to GitHub:
$ git commit
$ git push
Publish website on GitHub:
$ octopress deploy
Improved Code Blocks
The default set up of Octopress 3 does not include very pretty code blocks, so lets fix that at least.
First install the Ruby Gems you’ll need:
$ gem install octopress-solarized
$ gem install octopress-codefence
Then we need to tell Octopress 3 that you want to use these plugins on your site. Edit the
_config.yamlfile and add the following to the end:
gems:
  - octopress-codefence
  - octopress-solarized
You can configure each plugin also, and with the default theme it is best to use the light “Solarized” theme. Create
_plugins/octopress-solarized/config.ymlwith the contents:style: lightAdd this to the repository.
$ git add _plugins
$ git commit
$ git push
If you have
jekyll serverunning, you should restart it as described previously.Now you can write a code block as follows:
```C++
int main(int argc, char *argv[])
{
    printf("Hello world\n");
}
```
Which will look like this:
int main(int argc, char *argv[])
{
    printf("Hello world\n");
}
Write Your First Blog
- Create a new post, replace
"My First Post"with the right title:
- Edit the file
_posts/YYYY-MM-DD-my-first-post.markdown, replacing with the current year, month, date and title. - Add some Markdown to make your first post.
- If you are running
jekyll serve, save the file and refresh your browser and you should see your changes. - At any time use
git addandgit committo commit local changes to your post or website. - At any time use
git pushto save your source changes to GitHub. - Once everything looks good to publish use
octopress deployto publish your website on GitHub. - Repeat this to add more blog posts.
Go Crazy
You might want to do more crazy things later:
- Install more Jekyll and Octopress 3 plugins.
- Look into Octopress 3 Ink plugin and themes for a simple way to do this.
- As of Dec 2014 this part is still under development.
- Add a comment system.
- NEW See Free Blog Comments for follow up post showing how to do this.
- Find or make your own theme.
- Add a better home page.
- Add other pages, background images, and common headers and footers.
- Look at other people’s Octopress blogs for inspiration, and check
their repository sources to see how it’s done.
- See https://github.com/harveyt/harveyt.github.io for the source to this blog.
Some of these might be a subject for a future tutorial.